Using Telega v1.0 with PX4-based flight controllers
This tutorial explains how to integrate a Telega based ESC with a PX4 flight controller.
Prerequisites
It is expected that you are already familiar with PX4 and have set up a development environment according to the the official PX4 instruction. You are also expected to use the following software:
An example is based on a quadcopter with the following hardware:
At the moment of writing PX4 supports Cyphal only for fmu-v5.
Step 1. Build and load the autopilot firmware
At the time of writing, PX4 has separate build targets: for DroneCAN and Cyphal.
To build and upload the firmware you should explicitly specify cyphal in the make command. An example of build command: make px4_fmu-v5_cyphal upload.
Step 2. Configure autopilot parameters
Configuring the Cyphal PX4 Autopilot is similar to PWM or DroneCAN configurations. Basically, it requires the following steps:
- Select airframe
- Set up Actuators
- Calibrate sensors
- Set up radio and telemetry
Please, refer to the standard configuration PX4 docs for details.
The only difference is in the Actuators configuration step. You should select UAVCANv1 as shown on the picture below:
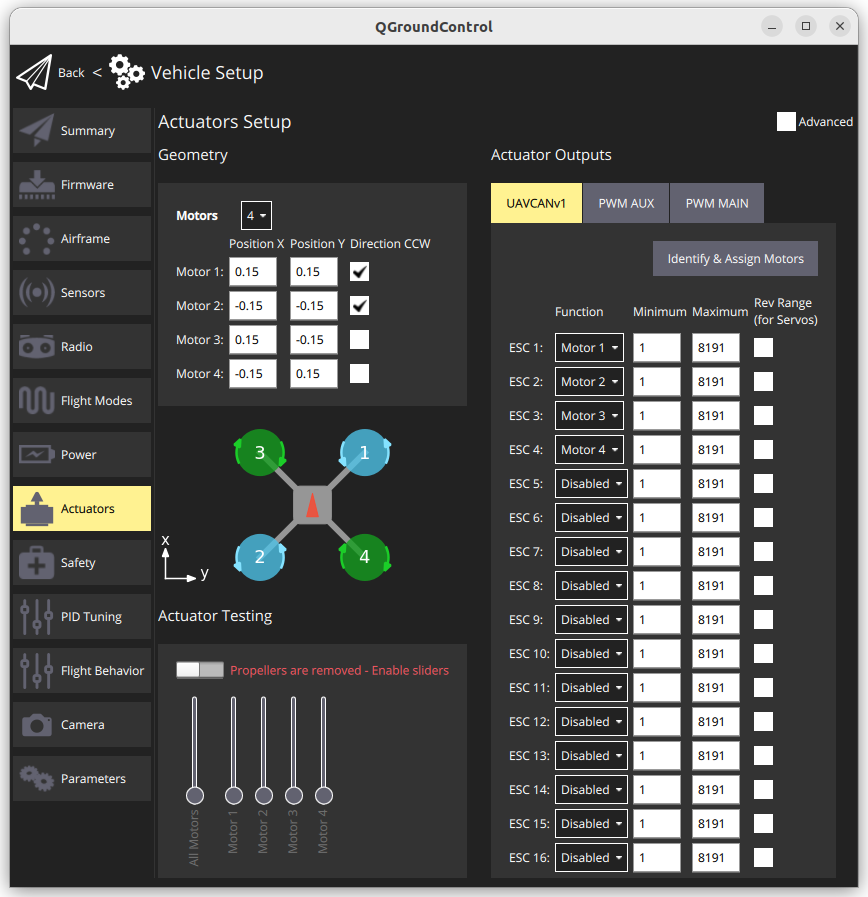
You can also check that the Cyphal-related parameters are correct.
| PX4 Parameter | Default value | Description |
|---|---|---|
| CYPHAL_BAUD | 1000000 but/s | Cyphal/CAN bus bitrate |
| CYPHAL_ENABLE | Enabled | Whether to start Cyphal driver or not |
| CYPHAL_ID | 1 | Cyphal Node ID |
All other Cyphal parameters can be configured using the Yakut or Yukon utilities.
Step 3. Update Telega firmware
If your Telega-based device doesn’t have any firmware, or it’s not up to date, follow the instructions on the Update the firmware page to update it.
Step 4. Connect everything together
Follow the Cyphal/CAN device interconnection guide for connection details.
Step 5. Plug and play with yakut
By default, your devices have no identifiers and operate in anonymous mode. You should perform the plug-and-play (PnP) node-ID allocation procedure. Follow the instructions on the Configure the Cyphal stack page.
Don’t forget to reboot the devices at the end.
Step 6. Configure the Cyphal network (registers) using Yukon
This step explains how to configure the port IDs and device parameters via the register interface.
The minimal Cyphal Quadcopter with Telega ESC network requires at least the following registers configuration:
On the Telega side:
- uavcan.sub.setpoint_rat_torque.id
- uavcan.sub.readiness.id
- mns.setpoint_index
On the PX4 autopilot side:
- uavcan.pub.udral.esc.0.id
There are several ways how to configure the registers, but the most intuitive for beginners is to use Yukon.
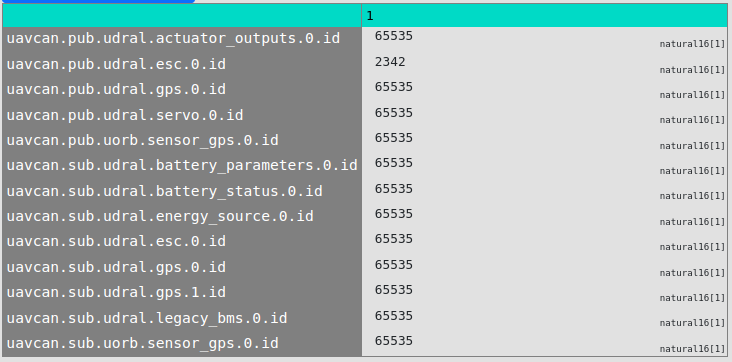
Configure the Cyphal stack and run Yukon. Then open the Monitor window and you will see the following:
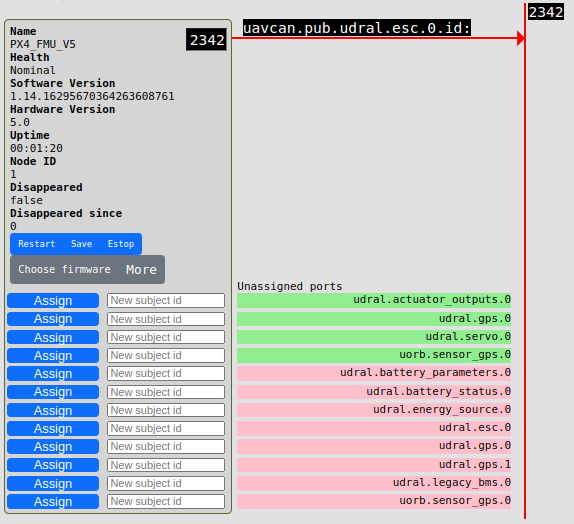
Select the port identifiers for the setpoint and readiness ports. According to the specification they should be in the range [0, 6143]. In the figure above, the setpoint port id is 2342 and readiness port id is 2343.
Assign a desired setpoint id in the PX4 udral.esc.0 port. This will create 2 publishers: setpoint with the corresponded id and readiness with setpoint id + 1.
Assign a desired setpoint and readiness identifiers to all ESCs.
Then open the Registers window and configure the mns.setpoint_index register according to the airframe.
Finally, it is a good idea to save the registers as a yaml file.
Step 7. Motors bench test
Continue with this step only if your propellers have been removed!
It is recommended that you test your motors with QGC Actuators prior to the actual flight test. USB-CAN sniffer is not required for this step.
Open the Actuators page in the Vehicle Setup window in QGC and try the sliders.
This step is necessary to check the following things:
- The direction of rotation is correct. If it is not, it means that you have connected the motor incorrectly.
- The setpoint indexes are correct. If it is not, go back to the previous step and change the corresponding register value.
An example of motors test is shown in the video below:
A video example will appear here soon!
If everything is in order, your vehicle is ready for the next step.
Step 8. Flight test
A video example will appear here soon!
Troubleshooting
Q1: My motors stops for a while from time to time
A1: Check that the value of the mns.deadman_timeout register is configured according to the Deadman timeout description. The default value of 0.5 seconds should be sufficient in most cases.
Q2: An autopilot node doesn’t appear in Yukon
A2: Check the value of the PX4 CYPHAL_ENABLE parameter. Try cyphal status in the MAVLink console to make sure the cyphal task is working properly.